Wednesday, March 31, 2010

Last day of Sale-A-Bration

I can't believe today is alredy the last day of Sale-A-Bration!! I love this time of year, it is so fun to get freebies. Oh,well.. we will see what goodies there are next year I guess.

Tuesday, March 30, 2010

Petal Party Scrapbook kit

I have had a request to show another album that I put together using the Petal Party Simply Scrappin kit. This was a lot of fun!

Thursday, March 25, 2010

3/25/10 Ink/stamps -- h2oski


As some of you know my family is all big into watersports. This is the card that I made for my son to give to my husband on his Birthday. My son's request was something "cool". It is about 35 degrees here right now, so I thought the "Make a Wish" sentiment was appropriate with a waterski stamp! The papers are SU, the embossed white background is the Sizzix Summer Fun set. No frills or bling on this one for the guys.

Monday, March 15, 2010

Videos of the Scrapbook Album in a Day

It would be best if you watch Part 1 first that shows the basic album. Part 2 shows the album spruced up more.


Album in a Day - Simply Scrapin class kit - w/ free Sale-A-Bration option

Would you like to try to catch up on your scrapbooking? This kit can help you do that - it would be great if you have a graduation coming up that you need to complete an album for, or maybe a special gift, or just to try to get caught up. It is perfect for beginning scrapbookers and advanced as well!

These albums can be as simple or detailed as you like. You really can complete a simple one in about 4 hours. The more details you add the longer it will take. I created my semi detailed one in about 12 hours total - that includes photo cropping, matting, some Cricut die cuts, embellishing, etc.

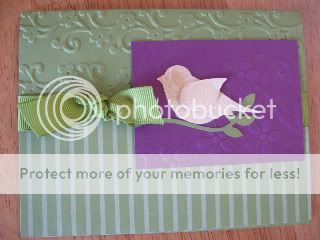
You can make a variety of album types. You will pick which Stampin' Up! Simply Scrappin Kit you would like for your album style.

Yes, it really CAN be done!! You can create a 20 page album (10 2-page layouts) in a day! I will be posting 2 videos showing you my completed album (using a retired kit) so you can see what the basic album & a more detailed one might look like.

I am offering this as a class kit. The cost is $58 which includes priority shipping to you. I have taken classes at retail stores for $20 for a 2 page layout, so this is a good value.

What you will receive:
1) 2 Simply Scrappin Kits (of 1 style)
2) Printed easy to follow directions with pictures
3) All of your paper cut to size as needed
4) 8 additional sheets of 12x12 card stock
5) One sheet of Stampin' Up! dimensionals
6) Price of $58 includes priority shipping from me to you.

Each SU Simple Scrappin kit (you will get 2) contains:
-3 sheets each of 2 dsigns of Designer Paper (6 sheets total)
-2 sheets each of 4 colors of 12x12 textured card stock (8 sheets)
-2 sheets each of 3 styles of 6x12" self-adhesive diecuts (includes borders and journaling spots). These are really nice more like diecuts that sticker. I was not sure I would like them as I am generally not a fan of stickers, but I DO like these! They look realy nice.

Your class kit will have a total of 36 pieces of coordinating 12x12 papers (card stock & Designer Series Paper), 12 sheets of die self-adhesive diecuts, and 1 sheet of Dimensionals. If you add $10 in additional SU products (coordinating ribbon or ink would be nice!)you may choose a free Sale-A-Bration item. Your total cost for 1 kit is $58, you may add a second kit for $45. You may also add any additional items that will fit in your box for no additional shipping costs from me to you.

You can view the Simply Scrappin Kits available here:
http://www.stampinup.com/ECWeb/ItemList.aspx?categoryID=628 (also top right corner on my blog is a link)


If you are interested and/or would like more information, please send me an email (sbralli@yahoo.com). I have just discovered this class and I am excited to share it with everyone!

Saturday, March 13, 2010

Make your own embossing folders - no Cricut required


Hello! I wanted to show you a couple of different ways you can make your own embossing folders. You do not need to have a Cricut to make them. You can use your Cricut, but there are other options as well.


Here is the card I made with my own embossing folder that I used a SU Bigz die to create:

Thursday, March 11, 2010

cropstop.blogspot.com challenge 3/11/10


I would like to challenge everyone to use your dies to cut out anything BUT paper! Some examples could be: chipboard, felt, fabric, foam, etc. Then use that item on a card or layout, whichever you prefer. Here is my example. I used Bigz dies to cut Grungeboard. The swirl flourish and the tag are both Grungeboard. I then inked them in the coordinating red. The swirl is covered in Candy Cane Stickles. The tag was inked, then sprayed with a red tone Glimmer Mist, then outlined with Stickles. Papers are SU & MME.

Tuesday, March 9, 2010

3/9/10 Die'ing 4 U


I really had fun with this card and I hope you enjoy it! It was really simple & quick which I also like! I used the new Nesties Labels 12 (a must have I think!) for the bee image, SU cardstock, the medium dots QK embossing folder for the yellow background to make it look like a beehive (debossed side up). PTI sentiment stamp, CTMH bee stamp embossed with Versamark and black embossing powder, MS corner punch.

Sunday, March 7, 2010

Punched flower


Here is my punched flower for Dalis bloghop challenge:

Blog candy! Office Help Cricut Cartridge **Winner posted**


I am going to offer up some blog candy. I would like to get to at least 50 followers on my blog. All you have to do is:
1)Become a follower of my blog & of the cropstop blog
2)Leave a comment on any of my blog posts
3)Leave a comment on this post so I know that you have done #1 & #2

One item for sure for sure for my candy will be the Cricut Office Help Cartridge! I will also have other items for you as well.

(Lynn M you will be included also - thank for following!)

Blog candy will end at 5:00 pm CT on Thursday, 3/11/10. I will draw a random winner.

Charlie and the Chocolate Factory - tip


My tip for the hop is for how to get a clearer image with your acrylic stamps. Have you ever had the ink look blotchy after you stamp? To get a clearer image try this:

1)First ink your stamp in Versamark
2)Then ink your stamp in the ink pad color of your choice (without cleaning it)
3) Stamp your image

You will get a much sharper stamped image. If you are doing multiple images of the same stamp, just don't forget to clean your stamp before you put it back into the Versamark!! Happy stamping. This technique reminds me of melted chocolate - the Versamark is sticky like chocolate & helps the ink to adhere better to the stamp.

Cropstop Bloghop!

We are so close to Oscar time that we decided to do a themed blog hop to present to you our new design team members. This blog hop will have 9 stops in total and in all those stops our design team members will be sharing with you a tip or giving you a challenge. There will be prizes drawn from those that submit their entries to the blog hop challenges by midnight Monday CST. You NEED to submit your entry for the blog challenge as a comment to the design team blog post in her own blog. (example: If you are doing Vicki's challenge then you need to leave Vicki a comment on her blog post with a link to your project) Sign up to "follow" our blog and you might win a prize. Our red carpet order is as follows: 1. CropStop's BLOG - http://www.cropstop.blogspot.com/ 2. Vicki - http://validationofvicki.blogspot.com/ 3. Elisabeth - http://paperart.wordpress.com/ 4. Jessica - http://blogg.coffeeaddicted.se/#home 5. Gloria - http://www.gloriascraps.blogspot.com/ 6. Lisa - http://pop-dot-porcupine.blogspot.com/ 7. Stacy - http://stacystampinscrappin.blogspot.com/ ***YOU ARE HERE*** 8. Anneliese - http://www.queen-of-the-crop.blogspot.com/ 9. Dalis' BLOG - http://www.stampergirl.com/

Thursday, March 4, 2010

Misc cards


Here are some more cards I have been working on. I made at least 4 of all of these except the Birthday card that was for my sister (she loves purple!). The green bird card is not my own design - it was in our SU magazine. I just embossed the top part of it where they had it plain. The purple on that card is actually Rich Razzleberry it didn't come out true to color in the picture for some reason. I didn't put a sentiment on this one so that I can quick stamp whatever I might need. The other bird card in light orange is my own design. I was challenging myself that day to use colors that are typically not ones I would pick. These are almost all SU papers, except a few scrap papers. I used the new Labels 11 for my sisters B-Day card.

Hubby's Birthday cards


The tree card is the one I made for my husband. My daughter asked me to post her card, too. I am sure she would love any and all comments to her!

Wednesday, March 3, 2010

I am a Guest Designer!

YAY! I am so excited to be a Guest Designer for: http://cropstop.blogspot.com/ for March and April. We are having a blog hop on Sunday. I hope you can join us! I will post more details then. I hope you can join us for lots of fun challenges and some tips!